Nira Risotto #vegan

Garlic chive risotto

Nira risotto

Simple things are often the best. If I were tired and sleepy, but hungry, what would I cook?! – Risotto. You just throw a few things in the pot and simmer.

Such was the case last Saturday night. It was still cool enough for a hot meal before the impending heatwave.

Anyway, here are what I’ve used.

  • 1/2 tsp turmeric
  • a dash of blackPepper
  • 1/2 tbsp oliveOil

I always start with above three when frying veggies

  • 1 cup of Nira – cut
  • 1/2 cup Shiitake – sliced
  • 2 cups filtered Water
  • 1/2 sheet of AburaÂgé – diced
  • 1 cup cooked shortgrain Rice

All in bite-size

  • 1/2 tsp kelp powder
  • 1 tsp golden flaxseed meal
  • a pinch of lemon zest
  • 1 tbsp ginger – peeled n diced*
  • 2 tsps soySauce
  • A sprig of fresh dill*

*optional

You can substitute kelp powder stock with a vegetable bouillon or 1/4 tsp seaSalt. Umami is still there from Nira, Shiitake and AburaÂgé. Kelp does help get the excess sodium out of the body though.

Anyway, here’s how I make Nira Risotto. (2 servings)

  1. Turmeric, blackPepper, & oliveOil in the saucepan, and turn the stove on medium.
  2. Add Nira & Shiitake, and stir.
  3. Add Water, AburaÂgé, & Rice, and stir. Bring it to boil, turn the stove low, and place the lid to let it simmer for a few minutes.
  4. Add Kelp powder, golden flaxseed meal, lemon zest, and soySauce, and stir. Let it simmer for another minute with the lid on, and turn the stove off.
  5. Serve while it’s hot, garnish with fresh dill, and enjoy!

Nira and Shiitake in the pot

Nira Risotto in the pot, nearly done!

All my cooking is low sodium. I incorporate multiple umami sources to make it tasty.

If you eat out often, you’re probably used to salty food. If you’re trying to reduce sodium intake, try adding garlic powder or nutritional yeast instead for taste. Our brain is flexible, and two weeks is all it needs to readjust to a less salty taste preference.

Nira Risotto - vegan

Made with more Nira

By the way, I make the cayenne infused soySauce by filling a small jar with dried whole cayenne peppers and soySauce, and leave it on the counter for a few weeks. It gives the soySauce peppery flavor without heat. And that’s what I used for this recipe.

Happy cooking and eating!

———

P.S. Nira is the Japanese name for Garlic chives aka Chinese chives. I grow them in my community garden plot. Cottontail rabbits have been choosing to nest in my plot, and it becomes the bunny nursery in the fall & the spring so far. They like to hide in Nira bushes! Here’s a tweet:

🐇🐇💚🌱🌱🌱

#vegan Fried Rice simplified version

I love fried rice. I got a hang of making vegan fried rice, I found myself simplifying the method & ingredients the other night.

So here it is.

Ingredients:

  • 1 tablespoon OliveOil
  • 1/2 teaspoon Turmeric
  • Dash of BlackPepper
  • 1/4 package ExtraFirm Tofu
  • 2 tablespoon hummus
  • Cubanelle & Jalapeño peppers*
  • 2-3 Cremini Mushrooms*
  • 2 cups Cooked BrownRice
  • Dash of Garlic Powder
  • SeaSalt+WhitePepper+SoySauce

Method:

  1. Add Turmeric, BlackPepper, & OliveOil in a fryPan on medium heat.
  2. Squeeze the excess moisture out of Tofu in your hand, add to the pan as crumbling it. Don’t worry about moisture, much of it will evaporate.
  3. Add hummus, & quickly stir.
  4. Add diced Peppers & Mushrooms, & stir.
  5. Add BrownRice, & stir.
  6. Sprinkle garlic powder, sea salt, & white pepper to taste.
  7. Reduce heat to low, & sprinkle soySauce, & stir.
  8. Serve & enjoy eating while it’s hot!

Here’s a twitter video:
https://twitter.com/otterX/status/950763948848091138/video/1

* Regular fleshy peppers will take longer to reduce the excess moisture.

White or Shiitake mushrooms would be fine, too.

I recommend getting a rice cooker if you don’t have one. Rice is the best carbohydrate to give me sustainable energy.

I would add minced ginger, too. It’ll give a little zing!

Happy cooking & eating!

#Oatmealette – #vegan oatmeal omelette

oatmealette - vegan oatmeal omelette

oatmealette – vegan oatmeal omelette

oatmealette with rice, tomato, avocado, & parsley

oatmealette with rice, tomato, avocado, & parsley


Basic oatmeal for two

  • 1.5 cup (filtered) water
  • 1/2 cup (organic) rolled oats
  • 3 TBSPs ground flaxseeds

Mix all the ingredients in a small saucepan, let it cook in medium heat for 4 minutes, stirring occasionally. Cover to steep for a few minutes.

Now for oatmealette

  • The basic oatmeal for two
  • 2 TBSPs Garbanzo+Fava flour
  • 1 tsp coconut oil 
  • A few peppers (I used jalapeño, cubanelle, & yellow lunch peppers) – sliced
  • 1/6 packaged firm tofu – drained (I just squeeze chunks gently in my hand over the sink)
  • A few sprig of parsley (optional)
  • 2~3 TBSPs Daiya vegan “Mozzarella” shreds
  • A dash of Riesling (≒1TBSP)
  • A dash of paprika (≒1tsp)
  • SeaSalt & pepper to taste

I use the non-stick pan with the lid.

  1. Add coconutOil to the pan, and let it melt to coat the pan.
  2. Add garbanzo+fava flour to basic oatmeal you just made, stir until blended. Then scoop it onto the oiled pan.
  3. Spread the oatmeal mix in the pan with a silicon spatula. (Low to medium heat)
  4. Add chopped peppers, tofu, & Daiya vegan “cheese” shreds. (Also parsley if you like.)
  5. Fold in the oatmeal mix to shape like an omelette. (Take your time 😉
  6. Add a dash of Riesling, place the lid to let it steam for a few minutes on medium heat.
  7. Sprinkle paprika, salt & pepper to taste.
  8. Enjoy eating!

The oatmealette is soft & fluffy, rather than flipping, I pan-steam it to cook. You can use your favorite veggies. I just so happened to have peppers from the community garden now. They go so well!

If it’s difficult to shape an omelette, you can say you made an oatmeal frittata! It’ll taste the same. 😘

Here are some Twitter videos. 

‪https://twitter.com/otterX/status/917143519923396608/video/1‬

‪https://twitter.com/otterX/status/914191623537545218/video/1‬

Happy cooking & eating!

    #vegan MacAndCheese w/o nutritionalYeast

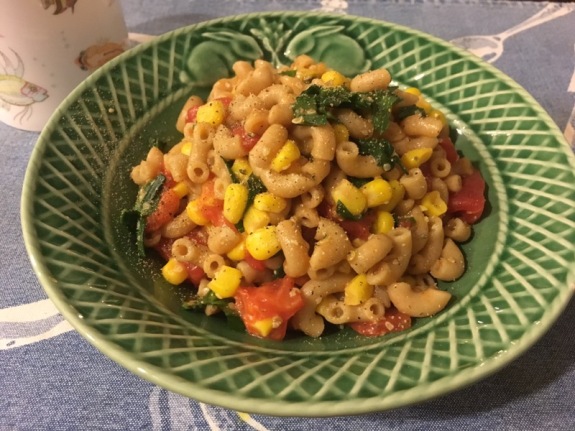
    Vegan tomato mac and cheese

    Vegan tomato mac & “cheese”


    Looks and tastes* like mac and cheese, without cheese or nutritional yeast, is weirdly possible.

    Ever since I realized cow’s milk in any amount causes me hay fever like allergy symptoms stemmed from the irritation in the bowel, I’ve been avoiding milk & milk products like plague. Recently, I heard that yeasts (baker’s, brewer’s, & nutritional) could cause irritation in some individuals susceptible with autoimmune disease. Like majority of people, I don’t have problems eating yeast. But the last time I hiked one of New Hampshire’s 4,000-footers, I couldn’t get my nose to stop running, the hay fever like symptom. I can’t say for sure, but nutritional yeast might have had a hand in it on my fatigued body after climbing Mt. Washington, the highest peak in the U.S. northeast.

    A long story short, I just wanted to see if I can make mac and cheese without nutritional yeast.

    Ingredients: (for 1~2 servings)

    • ‪½cup elbow‬
    • ‪½cup frozenCorn‬
    • ‪1 tomato pealed+diced‬
    • ‪¼almondCashewMilk‬
    • ‪¼cup hempHearts‬
    • ‪2tsp tapiocaFlour‬
    • ‪½tsp turmeric
    • ‪Dash oliveOil‬
    • ‪1tsp kelpPowder‬
    • ‪BlackPepper‬ to taste

    The method: 

    1. Boil water in a small sauce pan. (Place a lid for faster boiling!)
    2. Add elbows in the boiling water, & stir.
    3. Wait for a few minutes, then add frozen corn to the pan, & stir.
    4. Reduce heat (to low-medium) to prevent boiling over, & cook for several minutes.
    5. Drain, and add tomato, oliveOil & almondCashew milk, hemp hearts, tapioca flour, turmeric, & kelp powder (while the stove is off), and stir.
    6. Turn on the low heat, add celery leaves, stir until creamy.
    7. Serve and add blackPepper to taste. Enjoy!

    That’s all there is to it. Straight forward, & nothing fancy. I would have added frozen peas as well, but I was out of them last night. Maybe next time.

    Happy cooking & eating!

    * I’ve been eating vegan for 5 years, so I may taste things differently these days.

    Veggie Cooking 101 (#vegan)

    Cooking can be a chore, especially after a long day of work or play. Here’s my go-to method of quick and easy vegan dinner.

    What you need (in this example): makes 2 servings

    • Non-stick pan with a lid
    • OliveOil (1-2 tablespoons)
    • Turmeric (1/2 teaspoon)
    • BlackPepper (a dash)
    • SeaSalt (1/8 teaspoon)
    • Onion (1/2 big sweet onion)
    • Broccoli (1 good size stalk)
    • BakedTofu (1/2 package)
    • WhiteWine (2 tablespoons)
    • LemonPonzu* (1-2 tablespoons)
    • Plain cooked rice** (1 cup)

    Here’s how:

    1. Prepare veggies and tofu by cutting them into bite sizes.
    2. Put oliveOil, turmeric, blackPepper, and salt in the pan, turn on the stove to medium heat.
    3. Add the prepared veggies in the pan, add wine, place the lid, and cook (panSteam) for 5 minutes on medium heat.
    4. Add baked tofu, stir lightly, put the lid back on, and panSteam for another 10 minutes or so on slightly lower medium heat.
    5. Add LemonPonzu to taste, stir, turn off the stove, and put the lid back on until you’re ready to serve.
    6. Serve next to plain cooked rice, and enjoy eating!

    The whole thing will take about 30~40 minutes.

    ‪https://twitter.com/otterX/status/834806575944589312/video/1‬
    ——-
    * LemonPonzu: I make lemon ponzu. It’s made of fresh lemon juice, mirin (Japanese sweet cooking sake), and soysauce in 1:1:1 ratio. I keep it in a jar in the fridge. It’s a wonder seasoning for any vegetable, and well worth the effort to keep this available in the fridge at all time.

    ** I have a rice cooker. Rice (even white rice) is the best source of carbohydrate, and I eat it almost everyday. But even if you don’t, I highly recommend having one. Rice goes well with tomato sauce, too, instead of pasta!

    There you have it! If you’re new to (vegan) cooking, I hope you try this.

    Thanks for reading.

    Happy cooking & eating!!!

    #Vegan Miso Ramen

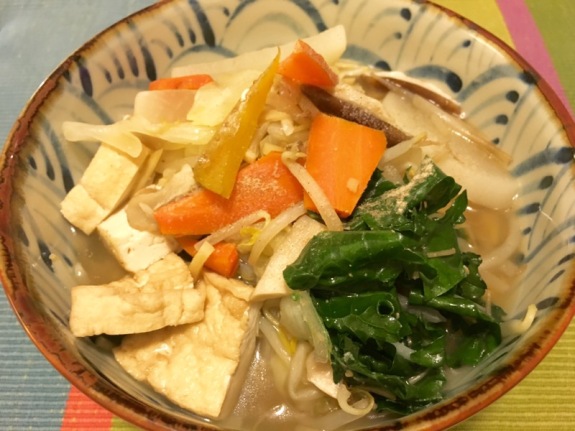
    vegan miso ramen

    vegan miso ramen


    I’ve got it! An authentic Japanese miso ramen broth made 100% plant-based! It wasn’t difficult at all.
    Here are what I used* in the first attempt:

    • 1 tablespoon coconut oil
    • 1/2 teaspoon turmeric
    • a dash of blackPepper
    • 3~4 cloves garlic – sliced.  
    • 1~2 tablespoon ginger chopped (or grated)
    • 3-4 shiitake mushrooms – sliced
    • 1/4 Onion – sliced 
    • 2 leaves of cabbage – sliced
    • 3 cups filtered water 
    • 3 teaspoons kelp or shiitake powder stock
    • 2 tablespoons of miso
    • 1 cup of mungBeanSprouts 
    • a few baby bokChoy 
    • 1 heaping teaspoon nutritionalYeast
    • whitePepper to taste
    1. In a medium sauce pan, add turmeric, blackPepper, & oliveOil while the pan is warming
    2. Add garlic, ginger, shiitake, onions, & cabbage; stirFry for a minute
    3. Add water, bring to boil, then simmer
    4. Add soup stock
    5. In a separate saucepan, boil water for the noodles, but before cooking the noodles, blanch kale and mungBeanSprouts, and set them aside.
    6. Add miso to the simmering broth 
    7. Noodles usually cook in a few minutes, best if you get them out al dente, using chopsticks & small handheld strainer
    8. Serve in the Asian noodle soup bowl, whitePepper to taste, garnish with green onions if you like.
    9. Enjoy eating!

    That was what I did back in May, which turned out fantastic! (if I may say so myself lol)

    Here’s what I’ve done a few nights ago, using daikon, atsuÂgé (deepfried Tofu) & kale instead of onion & bokChoy, & no added oil to start.

    1. In a medium sauce pan, add water, daikon, garlic, ginger, shiitake, & atsuÂgé. Bring to boil, then simmer.
    2. Add soup stock, ground sesameSeeds, nutritionalYeast, and miso.
    3. As the broth is nearly ready, boil the noodles in another pot.
    4. Add mungBeanSprouts and kale to the broth a minute before it’s ready.
    5. WhitePepper to taste. Serve and enjoy eating!

    I inadvertently simplified the first recipe.


    Both very satisfying. Hope you try it. Thanks for checking then out!

    Happy cooking & eating!

    ——

    * all amount of the ingredients are rough estimate

    Kimchi Paella (#vegan)

    Q: What do you do with the delicious kimchi brine at the end of the jar?

    A: Use it to make Kimchi Paella!

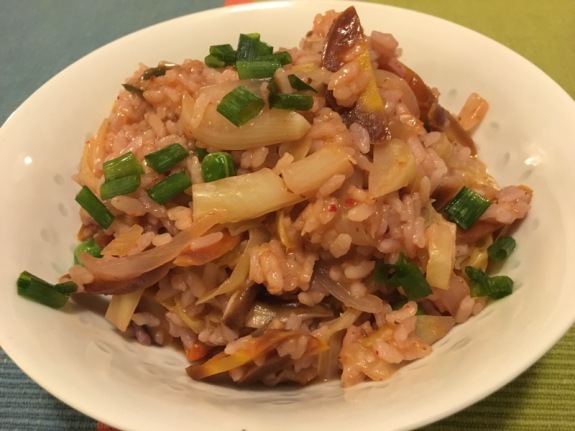
    vegan kimchi paella

    Vegan Kimchi Paella


    It’s quick and easy. Here’s the ingredients I used this time:

    • 1/4 onion – sliced in bite size
    • 2~3 leaves of cabbage – sliced in bite size
    • 1 carrot – sliced in bite size
    • 4~5 shiitake mushrooms – sliced
    • 1~2 cups purified tap water1
    • vegan kimchi & brine2
    • 2 cups plain cooked rice3
    • a dash of sake for cooking
    • 1/2 sheet of aburaAge – sliced in bite size
    • 1 heaping Tablespoon ground flaxseeds
    • 1/3 cup frozen (organic) peas
    • 3~4 tablespoons frozen chopped green onion4

    …and here’s how:

    1. In a medium sauce pan (I used a 2qt one with the lid), put onion, cabbage, carrot, and shiitake mushrooms, and filtered water, bring to boil, simmer for several minutes with the lid on.
    2. Add vegan kimchi and brine, and stir.
    3. Add cooked rice.
    4. Add aburaAge.
    5. Add flaxseeds
    6. Add a dash of sake (about 1 shot glass amount, 2 tablespoons). 
    7. Add frozen peas and green onions.
    8. Stir and simmer with the lid on for a few minutes. Turn off the stove, and let it sit for a minute.
    9. Makes 2 full dinner size (or 4~5 appetizer size) servings.
    10. Enjoy!

    The usual, vine loops;


    Happy cooking and eating!


    1 I do not buy bottled water any longer because they are not environmentally sound. Big soft drink industry, in some cases, taps into the public spring water sources unfairly to the local municipal economy. Not to mention the plastic bottle itself is detrimental to the environment, many ending up in the trash because most states do not have the law in place to enforce recycling water bottles. Transportation triply damages the environment with CO2 emission. So, no. I do not buy them unless life or death thirsty.

    2 Kimchi brine has a lot of umami, and I hate to throw it away. If there’s still chunks left in the jar, I recommend chopping up in bite sizes. If it’s too sour, add mirin (sweet cooking sake) or sugar to taste.

    3 I recommend a rice cooker. Every household otter (ought to) have one. Plain cooked rice is the source of the best glucose one can eat. I eat a lot of fiber, so I usually eat white rice to keep my intestines happy and balanced.

    4 The green part of the scallions don’t stay fresh in the fridge very long, so I usually chop them up to freeze. This batch I used are home grown.

    #KidneyBeanBurger on EnglishMuffin (#vegan)

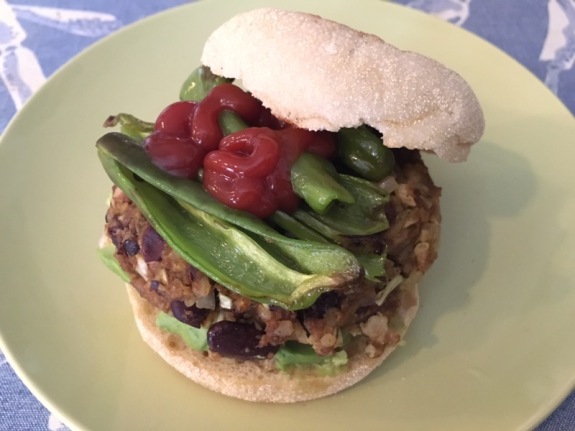
    kidney bean burgerKidneyBeanBurer
    I’m a lazy cook who make a big pot of something, & eat off it for days. This time, I cooked 2 cups of dry kidney beans. After making a pot of chili with the first half of it, I kept reheating the pot (twice a day) to keep the cooked kidney beans from spoiling. The beans got wonderfully soft toward the end of the pot, and thought perfect for making some bean burgers.
    A luck would have it, there was some leftover cooked rice, too. Perfect! I made my first burger without any recipes.

    It was easy! 

    Here are the ingredients I’ve used:

    • 1/2 cup well-cooked kidney beans (or 1 can drained)
    • 1/2 cup cooked shortgrain rice
    • 1/2 package of LightLife smartGround
    • 1/2+ cup panko breadcrumbs
    • 1/2 cup finely chopped onion
    • 1/3 cup finely chopped cabbage (1 leaf will do)
    • 1 teaspoon cumin powder
    • 1 teaspoon chipotle powder
    • 1/2 teaspoon ground time
    • 1/2 turmeric
    • A dash of blackPepper 

    I mixed all the ingredients adding the panko breadcrumbs a little at a time until it was sticky enough to shape 6 burgers.

    The amount of the ingredients above is a guide, and you can adjust the amount of panko to form burgers.

    Here’s a vine as usual.

    Another one, using a can of kidneyBeans.

    Spreading 1/8 avocado makes it even tastier!

    Notes: Dry beans cooked from scratch formed slightly better. The next time if I use a canned beans, I will cook them to soften them before making the burgers.

    Happy cooking and eating!

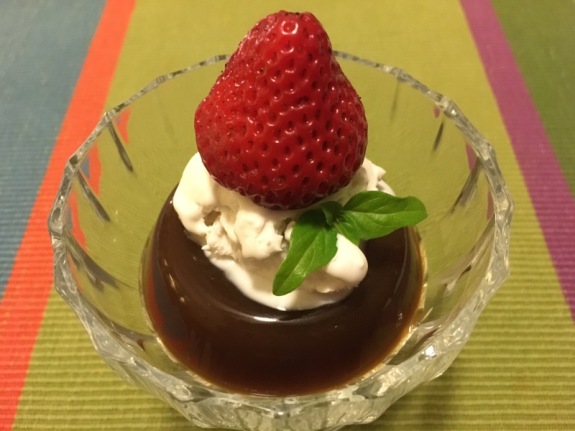
    Espresso jello dessert (#vegan)

    vegan espresso jello dessert

    Vegan Espresso Jello Dessert with coconutMilk whippedCream and an organic strawberry on top


    Thank goodness for nature—she provides everything we need to a T without ever harming animals. In this case, to make vegan jello dessert.
    Although it’s nothing new. I’ve had this vegan jello option since childhood, growing up in Japan. It’s called “kanten” in Japanese, and which is agar—extracts of algae.

    I use the powder agar that’s conveniently packaged for single uses. 

    What I used (for 6 individual servings):

    • 1 packet of kanten (agar) powder
    • 300ml of purified water
    • 150ml of freshly brewed espresso coffee + 100ml of purified water (you can use 250ml of strong regular coffee)
    • A dash of cinnamon powder
    • 1 Tablespoon of coffee-bean-soaked vodka (or coffee liquor)
    • 1/4 cup of cane sugar
    • 50ml of unsweetened almond+cashew milk
    • A small saucepan
    • 6 glass containers
    1. In the small saucepan, put kanten powder and water, & bring to boil.
    2. Simmer for 2 minutes, stirring occasionally.
    3. While kanten jelly liquid is simmering, prepare the coffee (espresso+water) by adding the coffee flavored vodka & cinnamon powder, & stir.
    4. Add the prepared coffee to the boiling kanten jelly liquid, & stir.
    5. Add sugar, & stir.
    6. Pour into 6 small glass containers (or tea-cups).
    7. Chill them in the refrigerator for a few hours until firm.
    8. Add a dub of coconutMilk whipped cream, & enjoy eating!

    Here’s a vine video:

    The big difference between cooking with kanten & gelatin is the jelling process; kanten requires to be boiled for a few minutes to form while gelatin only requires hot water.

    You can also use fruit juices or sweet wines instead of coffee. When you do, make sure the kanten jelly liquid is cooled off the burner for a few minutes before adding the acidic liquids.

    It’s really easy, yet so tasty! Oh, and guilt-free, because kanten is soluable fiber, which helps you regular!

    vegan espresso jello dessert with coconutMilk whippedCream & an organic strawberry

    Vegan Espresso Jello dessert w/ coconutMilk whippedCream & an organic strawberry


    Happy healthy cooking & eating!

    Tofu Scramble (#vegan)

    Good tasting vegan food doesn’t have to be complicated to make. This TofuScramble I just came up with is a keeper! It’s delicious, quick & easy!

    Tofu Scramble

    Tofu Scramble


    What I’ve used…

    • 1 teaspoon coconutOil
    • 1/2 teaspoon of turmeric
    • A dash of blackPepper+seaSalt
    • 1/2 cup onion—diced
    • 1 big clove of garlic—chopped
    • 1/2 package of firm tofu (I used TraderJoeSan’s organic)—cut into cubes & lightly squeezed (the excess moisture out) in the hand
    • 2 shiitake mushrooms—diced
    • 2 small jalapeño peppers—chopped
    • 1~2 leaf of cabbage (I used 2 small ones)—chopped
    • 3 Tablespoons of hummus
    • 1 teaspoon of ground flaxseed mixed in 1 Tablespoon of water
    • 1 teaspoon of nutritionalYeast
    • SeaSalt+whitePepper to taste
    • Frypan with lid

    …and here’s how I made it:

    1. In a heated non-stick frypan, put coconutOil, turmeric, seaSalt, & blackPepper.
    2. Add onions & stir. Then add shiitake, garlic, & cabbage, & stir. Place a lid, & let them steam in their own moisture for a few minutes (⇦this is important) in the low heat.
    3. Meanwhile, hand-squeeze the excess moisture out of the cubed tofu. Then add them to the pan & stir.
    4. Add hummus & stir. Then add flaxseed+water mixture & stir.
    5. Add nutritionalYeast & stir.
    6. SeaSalt & whitePepper (& 1/2 teaspoon of soySauce if you like) to taste.
    7. Served on steamed plain jasmineRice, & enjoy eating!

    Vine video:

    recent version:

    My reasons behind what I’ve used:

    CoconutOil mimics butter, & adds a dairy-like flavor.  It may not be totally healthy thing to eat, so I use it sparingly.

    Turmeric+blackPepper is the power combo for health. For more info, please learn at NutritionFacts.org (not affiliated).

    Onions, garlic, & shiitake are triple umami makers! You don’t need meat for umami if you use these three!

    Cabbage adds a wonderful hidden umami where vegan dishes need “oomph.” lol  IMHO, it adds a hint of animalFood-like odor.

    Tofu is such a versatile food! If you like Edamame, you’d like tofu, coz they’re both soyBeans! It’s an excellent plantBased protein.

    Hummus gives both the taste and texture of cooked egg yolk, and it works in cooking!

    Flaxseed+water mixture is one of the go-to ingredients in vegan cooking in place of egg-white.

    There you have it. All the ingredients work together to possibly fool an egg-lover 😉

    Happy Cooking & eating!